
Colony PCR is a quick and cheap method to check whether clones obtained after ligation and transformation into E. coli actually carry the desired insert. Bacteria are lysed and directly used for PCR with a primer pair flanking the insert. PCR reactions are then run on an agarose gel and stained with an appropriate DNA stain, such as Midori Green. A band of the correct size indicates that the bacterial colony carries a plasmid containing the insert.
Colony PCR is great because it requires no plasimd isolation and purification, is quick and cheap and can be done in a mid-throughput format, allowing analysis of dozens of clones at the same time. Still, it is a tricky method and often requires optimization, since impurities from the agar plates and cellular debris often inhibit the PCR reaction. In this bench tip, we go through the different steps of colony PCR and focus on how to avoid common pitfalls.
How is colony PCR done?
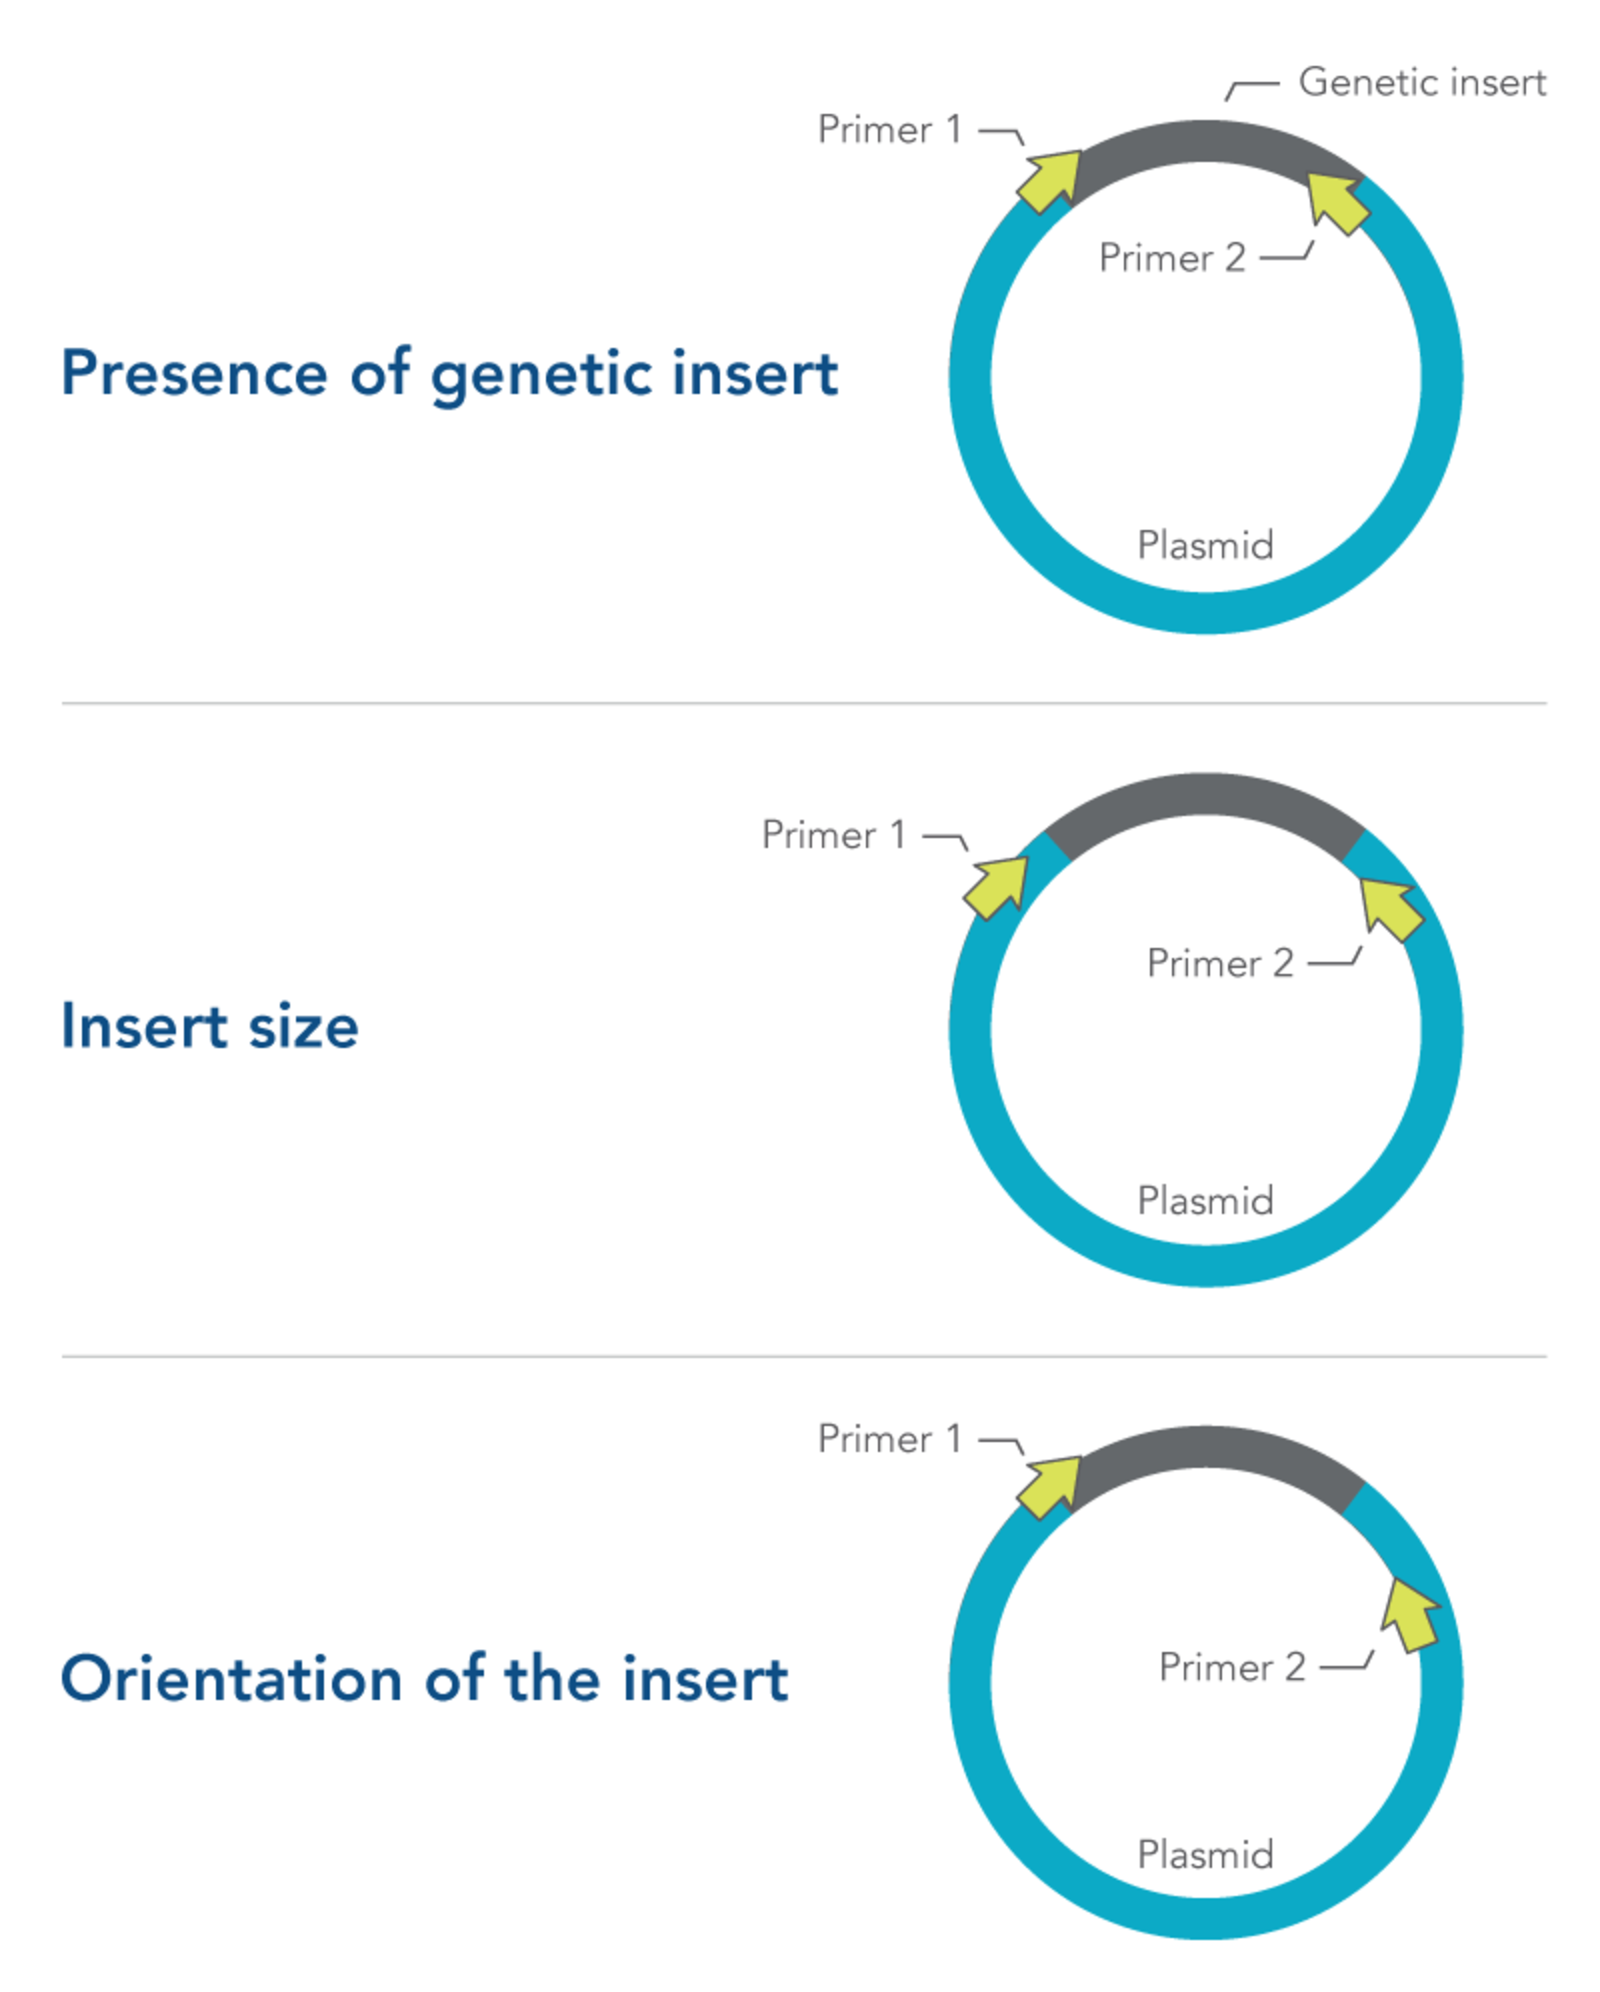
Primer design is especially important in colony PCR. Depending on what they are designed to target, primers selected for colony PCR can provide information about:
- Presence of genetic insert—primers are designed to target the insert and not the plasmid
- Insert size—primers are designed to flank the insert
- Orientation of the insert—one primer is designed to target the insert, while the other primer targets the plasmid
All three of these approaches require careful primer design and testing (Figure 1). More information about primer design can be found in the DECODED article, How to design primers and probes for PCR and qPCR.
After transformation, the colonies are picked with a sterile pipette tip, toothpick, or wooden applicator stick. Generate either a grided replicate plate or a 96 deep well plate with growth media. Either of these can act as a reference source for useful colonies after running the PCR reaction. The remaining cells on the pipette tip or wooden applicator stick can serve as the DNA template for a colony PCR reaction. Based on the number of colonies screened, make up enough bulk reaction mix and aliquot into PCR tubes or 96 well plate. Swirl the pipette tip or wooden applicator into a well to add the cells. During the thermocycling the cells will break open and release the plasmid template.
Colony PCR protocol
Step 1: pick clones
- Using a pipette tip, remove a tiny bit of bacterial material from a colony on your agar plate. Be careful not to scrape too much bacteria off and avoid touching the agar, as this may inhibit the PCR reaction
- Replicate the clone by touching the pipette tip onto a fresh agar plate or an agar-filled well of a 96well microplate
- Immerse the pipette tip into the tube or well of a PCR plate containing 10 ul of ddwater, swirl briefly and remove
- Repeat for all colonies you want to analyze
- Vortex the tubes/plate briefly to disperse the material and centrifuge to collect all liquid at the bottom
Step 2: prepare the PCR master mix
- Prepare your PCR master mix containing buffer, dNTPs, primers and enzyme. We recommend running 20-25 ul PCR reactions, but you may use bigger or smaller volumes, depending on your setting, PCR machine and available tubes
- A standard Taq polymerase is usually sufficient. For longer inserts or if Taq doesn't work, use more robust polymerases (e.g. hotstart, proofreading or superspeed polymerases)
| Component | Volume (for 25 µL) |
|---|---|
| PCR Master Mix with poylmerase (2X) | 12.5 µL |
| Forward Primer (10 µM) | 1 µL |
| Reverse Primer (10 µM) | 1 µL |
| Nuclease-free water | up to 24 µL |
- Finally, add 1 ul of the dissolved colonies from step 1
Step 3: run the PCR
- Use standard cycling parameters for your target (example below):
| Step | Temperature | Time | Cycles |
|---|---|---|---|
| Initial Denaturation | 95°C | 2–5 min | 1 |
| Denaturation | 95°C | 30 sec | 25–35 |
| Annealing* | 50–65°C | 30 sec | |
| Extension | 72°C | 1 min/kb | |
| Final Extension | 72°C | 5 min | 1 |
| Hold | 4–10°C | ∞ |
- Adjust annealing temperature based on primer Tm
- Adjust extension time based on the length of your expected insert
Step 4: analyze the PCR reactions
- After PCR, analyze the reactions by loading 5 ul of each PCR onto an agarose gel. Adjust the percentage of the gel according to the expected size of the PCR product
- The colony PCR product should be of the expected size and should represent a single clear band on the gel. If multiple bands are present or if the band is not in the correct size range, the colony tested likely does not contain the correct insert in the plasmid
If the band is in the correct size range on the gel and only one band is present, it is likely that the plasmid contains the desired insert. The final verification step is to sequence this PCR product to ensure that it has no mutations.
Tips for colony PCR
Colony PCR offers researchers a quick, straightforward method for screening clones generated during the molecular cloning process.
Here are some tips for your colony PCR:
- Avoid using too much starting material. It’s important when picking material from the colony that you avoid taking too much material. Beginners also tend to add too much of the resuspended cells to their PCR mix. 1 ul is usually more than enough - keep in mind that PCR is an extremely sensitive method
- Include controls. Both positive and negative controls should be included in colony PCR. A good positive control would be any DNA that you are sure should amplify using the primers selected, this helps to ensure that the PCR reaction ‘worked’, i.e., that the reagents used haven’t expired, etc. It is also recommended that a negative control is included – one reaction that hasn’t been exposed to a bacterial colony to ensure that your PCR reagents are clean. You can also use an old colony from an unrelated cloning experiment as an excellent negative control
- Beware of false positives. It’s a good idea to test multiple colonies and sequence all ‘positive’ results. Colony PCR can provide general information about the size of the amplified product; however, sequencing is important to ensure that small genetic edits such as SNPs have not been incorporated into your insert during the cloning process.
- No positives at all? Sometimes, E. coli cells lyse slowly. You can incubate the resuspended cells from step 1 for 5-10 mins at 95°C. This helps to lyse the cells and release the plasmid DNA. Make sure to centrifuge briefly at the end to collect all liquid at the bottom of the tube or well
- Non-specific bands? Try adding 1-2% formamide to the PCR master mix
Finally ready to get some good plasmid DNA from your colony of choice?
References
1. Azevedo F, Pereira H, Johansson B. Colony PCR. Methods Mol Biol. 2017;1620:129-139.
2. Gussow D, Clackson T. Direct clone characterization from plaques and colonies by the polymerase chain reaction. Nucleic Acids Res.. 1989;17(10):4000.
Supplier
IDT - Integrated DNA Technologies
With over 30 years experience as a manufacturer, IDT offers innovative tools for NGS, CRISPR, qPCR and PCR. IDT offers superior quality DNA and RNA oligos, genes, gene fragments, Cas nucleases and more, with fast turnaround times!